Best Photo Editing App || Pixlr Suite
Pixlr is not one app. It is a set of three tools that share an account and a visual language but solve different problems, and knowing which module to open first saves a lot of wasted tapping. Photomash builds product-style images with clean backdrops. Remove BG does one thing only. Pixlr M is the general editor where everything else happens.
The distinguishing feature of the whole suite is that it is largely manual. There is no button that reads your mind. You choose the crop, you set the sliders, you decide where the shadow falls. That is slower on the first attempt and considerably more repeatable on the fiftieth, which is the trade-off worth understanding before you commit.
Another editor with heavier AI assistance behind it
The Three Modules And Who Each Is For
Treating the suite as one product is where people get confused. The modules overlap slightly but they are aimed at different jobs.
- Pixlr M — the full editor, with reform, retouch, paint, adjust, filter and effect tools, for anyone who wants control over an entire image
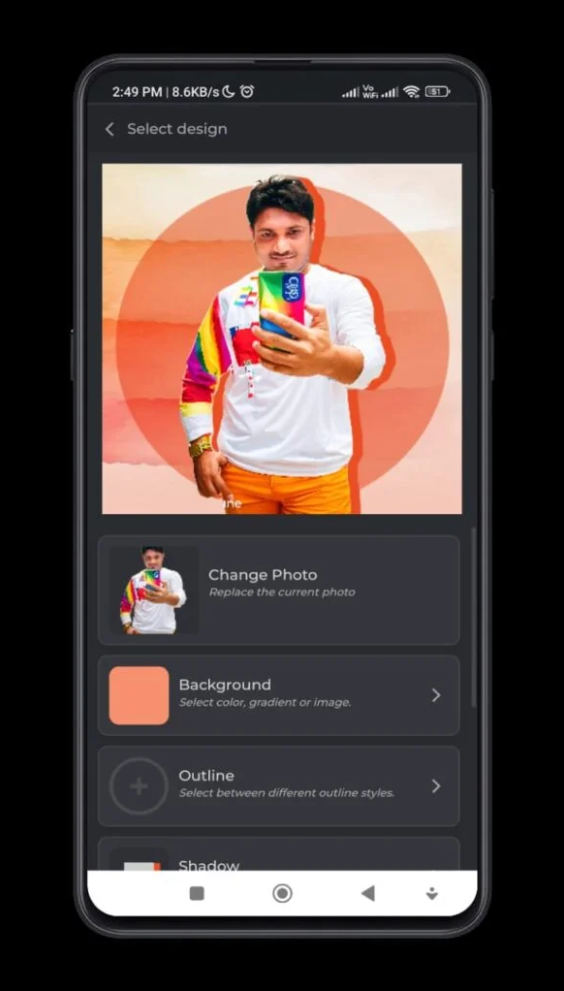
- Photomash — a guided workflow that isolates a subject and drops it onto a chosen backdrop at a chosen size, aimed at listings, thumbnails and profile pictures
- Remove BG — a single-screen isolator that returns a transparent cutout and nothing else, for when the cutout is all you needed
If your task ends with a transparent PNG, use the third. If it ends with a finished square for a marketplace listing, use the second. If it involves colour, texture or anything painted by hand, use the first. Opening the wrong one and fighting it is the most common complaint about this suite, and it is entirely avoidable.
Inside Pixlr M: What The Six Tool Groups Do
The editor opens on a choice between an existing image and the camera. From there the toolbar splits into six groups, and each one is worth a sentence because the names are not always self-explanatory.
Reform covers geometry: crop, straighten, rotate, and perspective correction for photographs of flat things shot at an angle. Adjust holds exposure, contrast, white balance, saturation and the histogram-style controls, and this is where the bulk of any serious improvement happens. Retouch handles local work such as blemish removal and smoothing. Paint gives you brushes, an eraser and a fill. Filter applies looks in one tap. Effect layers on grain, glow, vignettes and blur.
The useful discipline is order. Fix geometry first, then global exposure and colour, then local retouching, then any filter last. Applying a heavy filter and then trying to correct exposure underneath it fights you the whole way, because the filter has already crushed the tonal range you would need to recover.
Photomash: Backdrops, Outlines And Shadows
Photomash exists because a cutout on its own is rarely the finished article. Once the subject has been separated, the module hands you three controls that decide whether the result looks composed or looks pasted.
Backdrop sets the colour or gradient behind the subject. Outline draws a stroke around the edge, which is a blunt but effective way of hiding a slightly ragged cutout. Shadow drops a soft fall behind the subject and is the single control that most improves believability, because a subject with no shadow floats and the eye notices immediately even if the viewer cannot say why.
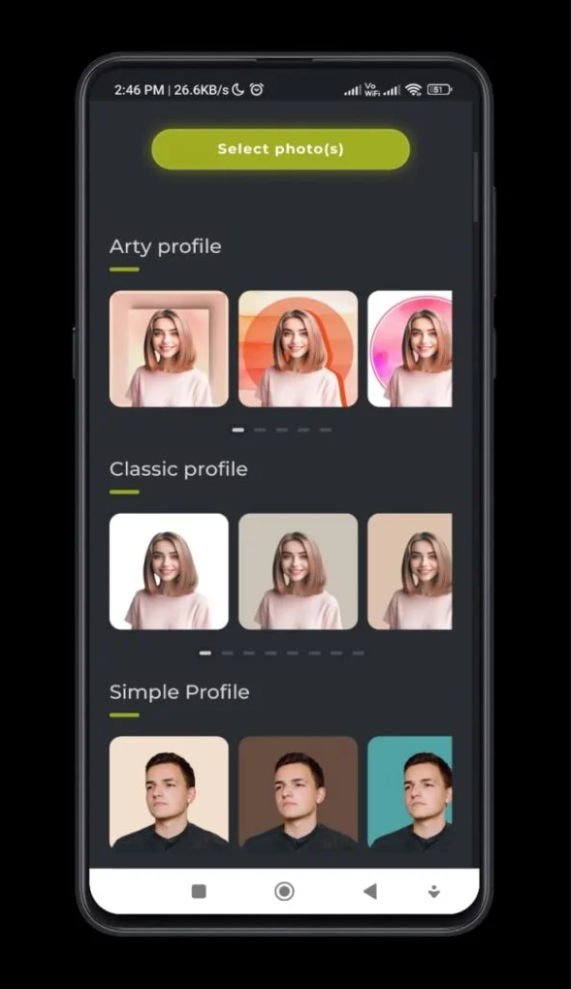
There are preset profiles to start from, labelled along the lines of arty, classic and simple, and they mostly differ in how aggressive the styling is. Start on the plainest one. Presets are a shortcut to a look, not a substitute for choosing your own, and the loud profiles date fast.
Output size is set inside the same module, which matters more than it sounds. A marketplace wants a square, a video thumbnail wants widescreen, and a profile picture gets cropped to a circle by whichever platform displays it. Choosing the frame before you position the subject saves redoing the composition later.
A Working Order For Isolating A Subject
Shoot for the cut: Separation is easier when the subject and background differ in tone. A dark jacket against a dark sofa will fight you no matter which tool you use. Two minutes of moving the object onto a plain wall beats twenty minutes of edge repair.
Run the automatic pass: Let the tool make its first attempt before touching anything manually. It will get most of the boundary right and leave the difficult areas — hair, thin straps, transparent material — for you.
Repair at high zoom: Zoom in and work along the edge with the eraser and restore brushes. Fixing a cutout while looking at the whole image at once guarantees you will miss the parts that actually give it away.
Add the shadow before the backdrop: Set the shadow while the background is still neutral so you can judge its softness honestly. A shadow tuned against a bright colour usually looks wrong once that colour changes.
Export at full size: Save the largest version the tool offers and downscale copies from it. Scaling a small export upward reintroduces every soft edge you just spent time cleaning.
Browser Or Installed App
The whole suite runs in a mobile browser, which is genuinely unusual for an editor of this scope and changes the calculation on a phone with limited storage. Nothing to install, nothing to update, and no permanent permission grants.
Open the suite in a browser and try the tools first
- Stay in the browser if internal storage is tight or you edit only now and then
- Install a build if you edit weekly, because it copes far better with switching apps mid-task
- Sign in before you begin either way, so an interrupted session can be picked up again
- Wait for wireless before uploading large files, since a weak mobile connection makes every step crawl
- Keep the untouched original in your gallery until you are happy with the finished version
The browser route has real costs though. Big images upload slowly on a weak connection, a dropped tab can cost you unsaved work, and switching apps mid-edit sometimes makes the page reload. An installed build survives those interruptions better and handles the file picker more gracefully. If you edit occasionally, stay in the browser. If you edit weekly, install it.
Manual Controls Against Automatic Ones
Plenty of competing editors will finish an image in one tap. They are faster and, on an easy photograph, the result is fine. The reason to prefer a manual suite is consistency.
If you are producing thirty product photographs that need to sit together on the same page, an automatic tool will make thirty slightly different decisions about brightness and colour. Setting the values yourself and repeating them gives you a set that matches. That is the entire argument for this kind of software, and it only applies if you are doing volume work.
For a single holiday photograph you want to post tonight, the manual approach is honestly overkill, and you should use whatever is fastest.
Where The Suite Frustrates People
Edge quality on difficult subjects is the recurring complaint, and it is a fair one. Flyaway hair, mesh fabric, glass and anything semi-transparent come back with visible fringing that no amount of outline stroke fully disguises. This is a hard problem for every tool in the category, but the suite does not lead the field on it.
The second issue is screen real estate. An editor with six tool groups and a canvas was designed with a larger display in mind, and on a compact phone the panels crowd the image. It is usable, not comfortable. A tablet transforms the experience.
Third, feature availability shifts between the free and paid tiers over time, so a control you used last month may sit behind an upgrade prompt today. Check before you plan a workflow around any single feature.
Pixlr Suite — Verdict
- Tool coverage — three modules span most everyday editing needs
- Cutout accuracy — solid on clean subjects, fringes on hair and glass
- Learning curve — steeper than one-tap rivals, repays the effort on repeat work
- Phone ergonomics — cramped on small screens, excellent on a tablet
Summary
A capable manual editor that rewards people doing repeatable work and mildly annoys everyone else.
Reader Questions About Pixlr
Does it work without an account? Basic editing does. Saving projects, syncing between devices and some export options expect a sign-in, and creating one is the least painful part of the whole process.
Can I keep a transparent background? Yes, provided you export as PNG. Saving a cutout as JPEG fills the transparency with white and there is no undoing that after the fact, which catches people out constantly.
Why does my saved file look worse than the preview? Almost always the export resolution. The preview renders at screen scale while the export may be capped lower on the free tier. Check the size setting before saving rather than after.
Is it safe to upload personal photographs? They go to a server for processing like most web editors, so the sensible rule is to keep documents, financial paperwork and pictures of other people's children out of any cloud tool, this one included.
Does it handle RAW files? Treat it as a JPEG and PNG editor. If you are shooting RAW you want a dedicated processor first and this suite afterwards, not the other way around.
Install it if you regularly need clean cutouts and consistent backdrops for listings, thumbnails or catalogue images, and if you have the patience to learn six tool groups. Skip it if you want a single button that fixes a photograph, because that button is not in here and pretending otherwise would only waste your evening.
Tap the button below to download the file directly to your device.
Get the Pixlr Suite package